Raspberry Pi Data Logger:
Raspberry Pi and Initial State

Elizabeth Adams | Feb 7, 2020
Introduction
So you have that Raspberry Pi sitting around and you are wondering what to do with it? With a seemingly infinite number of project ideas and tutorials online it can be overwhelming in the best way possible. The Raspberry Pi can be an easy, cost effective way to collect and send temperature data, location, and status. Initial State is an easy to use option to create a Raspberry Pi data logger.
Installation
The Initial State Python Streamer Module creates a simple way to send data from your Raspberry Pi Python script. Installation can be done through an automated curl command:
\curl -sSL https://get.initialstate.com/python -o - | sudo bash
or package management with the pip command:
sudo pip install ISStreamer
or if you are using Python 3 you can use the pip3 command:
sudo pip3 install ISStreamer
First Stream
Using the curl method adds the advantage of an example script that is downloaded and allows you to easily stream immediately to Initial State. Without making any changes you can run the example script with the following command:
python is_example.py
or if you are using Python 3:
python3 is_example.py
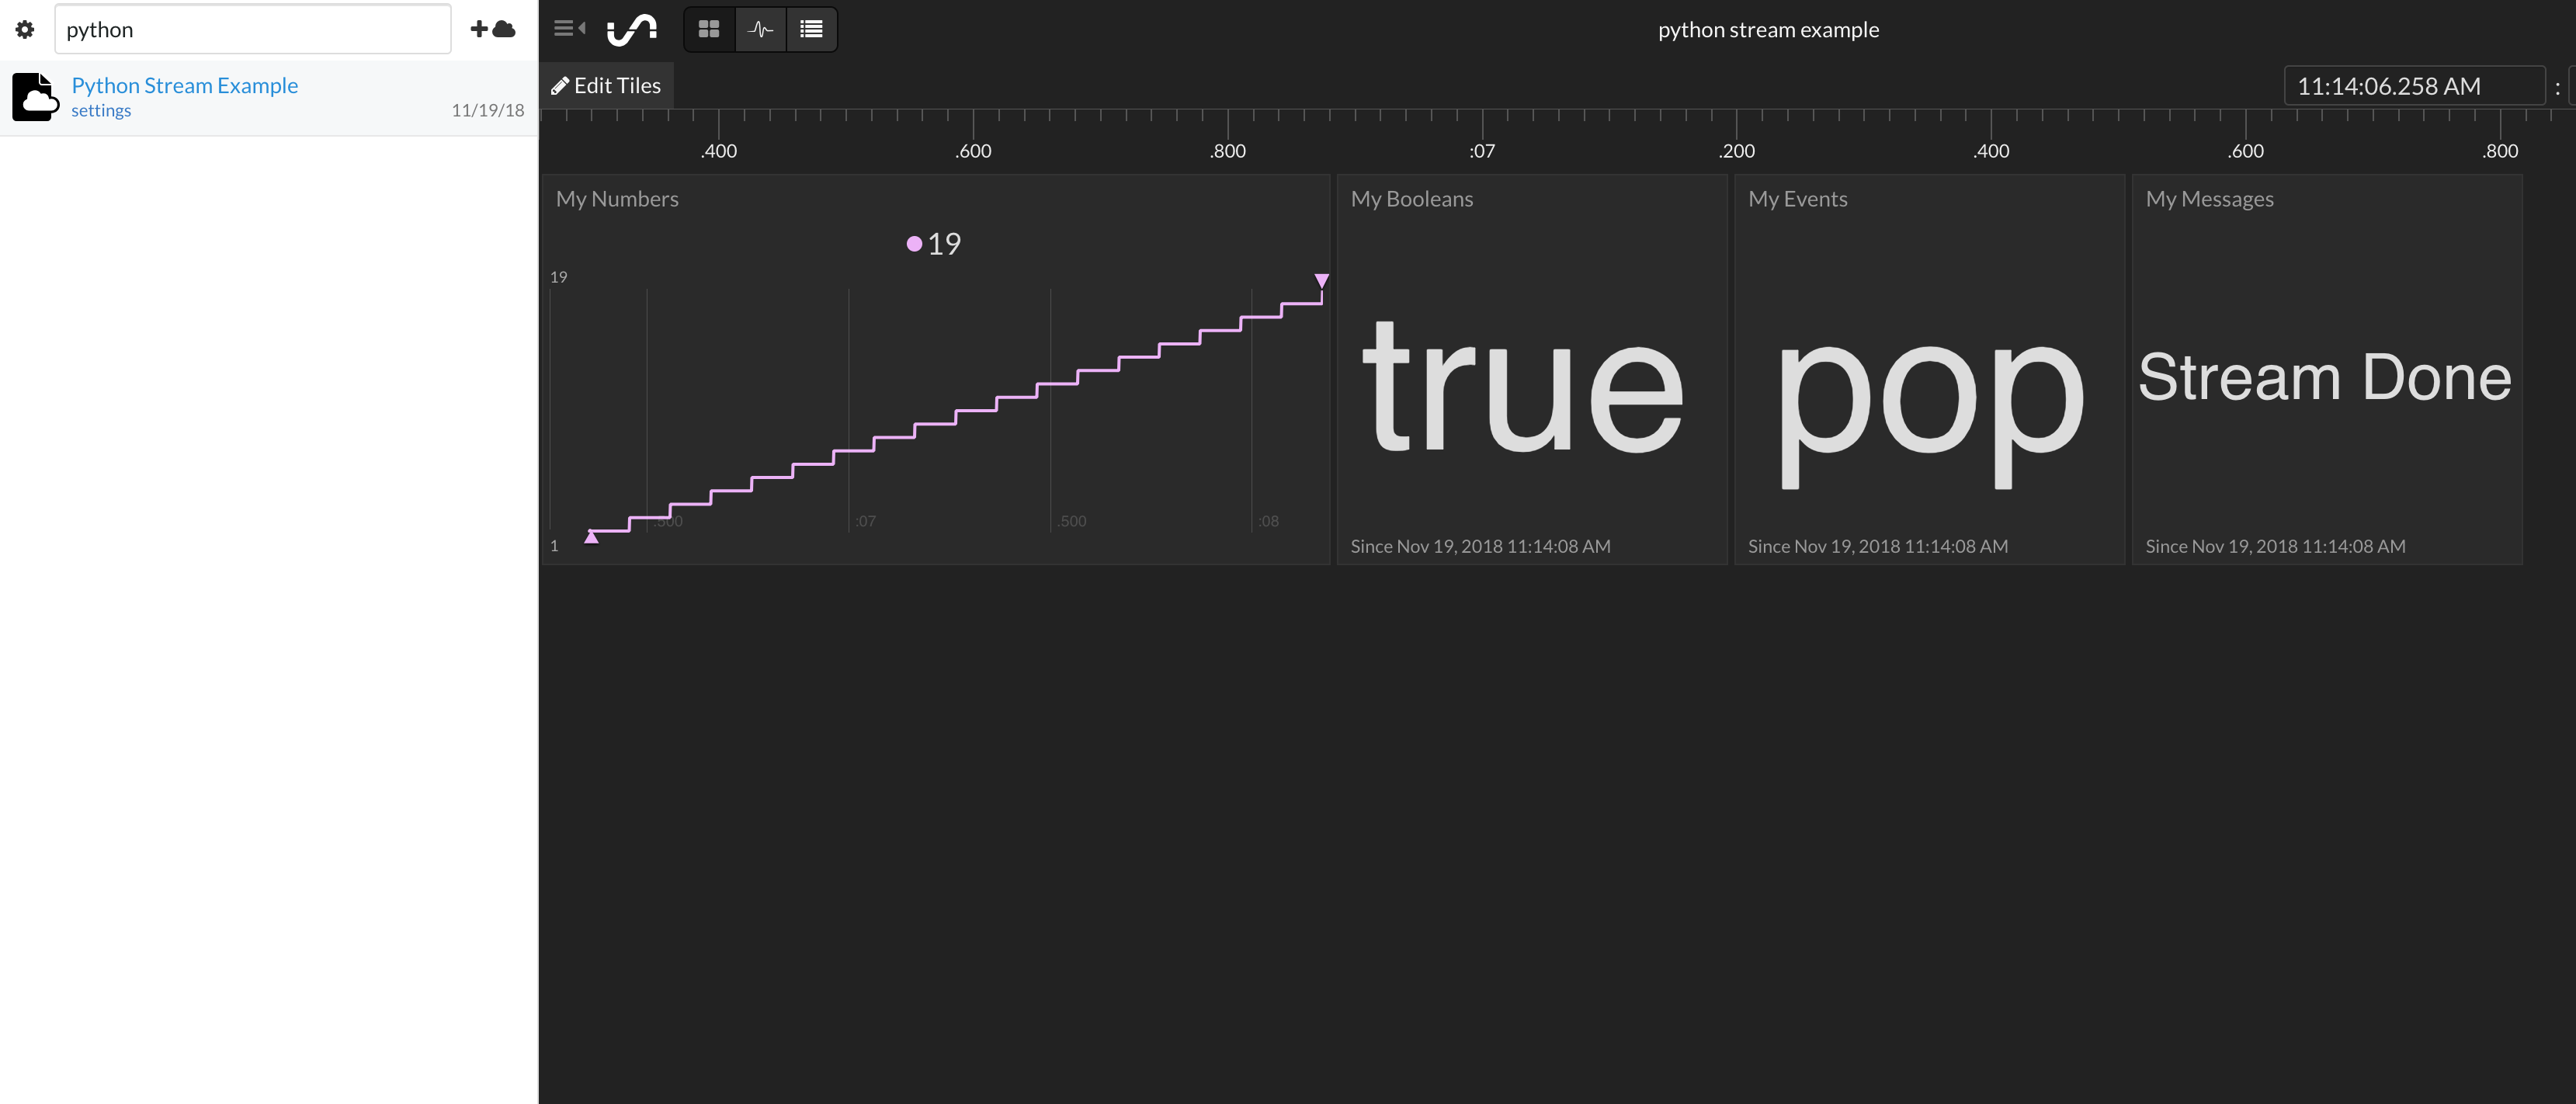
You can go to your Initial State homepage and view your new dashboard complete with numbers and strings. Move the Tiles around, change the Tile types, and add a background image. My point here is there is a lot you can do with this little bit of data.
A similar result can be accomplished with a basic Python script. This one will require you to enter necessary information (access_key, bucket_key) before being able to stream data.
							from ISStreamer.Streamer import Streamer

							# create or append to a Streamer instance

							streamer = Streamer(bucket_name="Some Bucket Name", bucket_key="bucket_key", access_key="YourAccessKey")

							# send some data

							streamer.log("test", "hi")

							streamer.log("temperature", 32)

							# flush data (force the buffer to empty and send)

							streamer.flush()

							# close the stream

							streamer.close()
# create or append to a Streamer instance
streamer = Streamer(bucket_name="Some Bucket Name", bucket_key="bucket_key", access_key="YourAccessKey")
# send some data
streamer.log("test", "hi")
streamer.log("temperature", 32)
# flush data (force the buffer to empty and send)
streamer.flush()
# close the stream
streamer.close()
Terminology
Let’s define some key concepts and words to help you better understand the Initial State Python Streamer Module.
Bucket — This a collection of event streams that share the same access key and bucket key. Each bucket has a unique combination of bucket key and access key that are required to stream data into that bucket. A new bucket is automatically created when the Streamer Module is constructed, however, if you want to append to an existing bucket you can use the optional bucket_key constructor parameter. If a Streamer is constructed with a bucket_key that already exists, then any data sent in that stream will append to the existing bucket.
Bucket Shelf — This is the collection of your data buckets on your Initial State homepage. It is found on the left side and your buckets are listed by their Bucket Name and in order of creation, with newly created buckets at the top.
Event Stream — A key with an associated set of values and timestamps. These individual events are created every time the Streamer.log method is called. If an event_key is the same for different pieces of data, those pieces of data are represented together in an event stream.
Access Key — This key gives you access to stream into your account. Access keys can be found in your settings. These should be kept private and if a key is compromised, it should be deleted and a new one created.
Bucket Key — A bucket key identifies which data bucket your data will be associated with when it is streamed into your account. Each data bucket has a combination of bucket key and access key associated with it.
Bucket Name — This is a specific name given to a bucket. This can be created in the streamer module but changed within the app.
Streaming Methods
Now that you’ve become familiar with the terminology, let’s discuss different methods that can be used with the streamer module.
Log Method
streamer.log(key, value[, epoch])
This is the core method and api for the event streamer. This is an asynchronous method that pushes your data to a queue that handles sending it off to Initial State’s servers. You don’t have to worry about anything but calling the method where you want! For the sake of clarity the Streamer would be replaced with the variable reference to a Streamer instance.
The log method expects two parameters, key and value:
- key is a string that represents the source of the value and is limited to 250 characters
- value is either a string, boolean, or number and it represents a value at the time of the method call.
- epoch is an optional parameter to override the epoch timestamp, recommended for advanced uses.
Log Object Method
streamer.log_object(obj[, key_prefix[, epoch]])
This is an enhanced method to abstract having to write a bunch of log statements to stream all of the values of an object with multiple data points at a specific time.
The log_object method expects one parameter, obj:
- obj is either a list, dict, or simple object with attributes.
- If obj is a list, it will use the key name list_n unless the optional key_prefix is supplied, then it will use key_prefix_n where n - in both cases - is an index.
- If obj is a dict, it will use the key name dict_key where unless the optional key_prefix is supplied, then it will use key_prefix_key where key - in both cases - is the key of the dictionary value.
- If obj is a simple object, it will iterate over the objects attributes and produce values for keys with the name of the key as obj_attr unless the key_prefix is supplied, then it will use key_prefix_attr. In all cases, attr is the attribute name.
- key_prefix is an optional string that, when supplied, overrides the default key prefixes.
- epoch is an optional number that represents the current time in epoch format.
Here is a useable example of this method:
							import psutil

							import time

							from ISStreamer.Streamer import Streamer

							# Provide a client_key from local ini file, override buffer and flush for optimal performance

							streamingstreamer = Streamer(bucket_name="Example Performance Metrics",bucket_key="compute_metrics", buffer_size=100, ini_file_location="./isstreamer.ini", debug_level=1)

							sample_rate_in_ms=100

							for x in range(1000):

							    streamer.log("sample", x)

							    # Get total CPU usage

							    cpu_percent = psutil.cpu_percent()

							    streamer.log("cpu_total", cpu_percent)

							    # Get individual CPU usage

							    cpu_percents = psutil.cpu_percent(percpu=True)

							    streamer.log_object(cpu_percents, key_prefix="cpu")

							    # Get the virtual memory usage

							    memory = psutil.virtual_memory()

							    streamer.log_object(memory, key_prefix="virtual_mem")

							    # Get the swap memory usage

							    swap = psutil.swap_memory()

							    streamer.log_object(swap, key_prefix="swap_mem")

							    # Get the network usage

							    network = psutil.net_io_counters()

							    streamer.log_object(network, key_prefix="net_io")

							    # flush the stream to ensure optimal buffer and consumption experience

							    streamer.flush()

							    # sleep before sampling again

							    time.sleep(sample_rate_in_ms/1000)

							# cleanup the stream and ensure logs are flushed

							streamer.close()
Close Method
streamer.close()
This method ensures that the log buffer is flushed and should be called when a program is exiting. It is best practice to call it at the end of a program to ensure it is executed.
Manual Streamer Flush
streamer.flush()
You can manually flush on your own by calling Streamer.flush(). This will ensure that anything that has been queued or buffered locally will get sent to Initial State's servers ASAP.
import time
from ISStreamer.Streamer import Streamer
# Provide a client_key from local ini file, override buffer and flush for optimal performance
streamingstreamer = Streamer(bucket_name="Example Performance Metrics",bucket_key="compute_metrics", buffer_size=100, ini_file_location="./isstreamer.ini", debug_level=1)
sample_rate_in_ms=100
for x in range(1000):
streamer.log("sample", x)
# Get total CPU usage
cpu_percent = psutil.cpu_percent()
streamer.log("cpu_total", cpu_percent)
# Get individual CPU usage
cpu_percents = psutil.cpu_percent(percpu=True)
streamer.log_object(cpu_percents, key_prefix="cpu")
# Get the virtual memory usage
memory = psutil.virtual_memory()
streamer.log_object(memory, key_prefix="virtual_mem")
# Get the swap memory usage
swap = psutil.swap_memory()
streamer.log_object(swap, key_prefix="swap_mem")
# Get the network usage
network = psutil.net_io_counters()
streamer.log_object(network, key_prefix="net_io")
# flush the stream to ensure optimal buffer and consumption experience
streamer.flush()
# sleep before sampling again
time.sleep(sample_rate_in_ms/1000)
# cleanup the stream and ensure logs are flushed
streamer.close()
Advanced Settings
Buffer Size
You can override the default event buffer size (the count of events) by passing the optional buffer_size parameter into the Streamer constructor. Here is an example:
streamer = Streamer(bucket_name="Hi!", access_key="YourAccessKey", buffer_size=200)
In this example, the buffer_size is being increased to 200 from the default of 10. The decision to override this value should be based on how many log statements you make in a loop before sleeping. You can typically play around with this number to help tune the performance of the Streamer. Additionally, a higher buffer_size may help if getting throttled by the API.
Timestamp
It can be useful to have the ability to send in data with a timestamp that is different from the current time. The way it automatically works is timestamp is automatically associated with data by retrieving the most accurate timestamp possible from the device as soon as a log or log_object method is called. However, you can override this by doing the following:
							time = time.time()

							streamer.log("siganl", 5, epoch=time)
Creating a New Bucket
When you construct a Streamer the constructor expects a name or a key that it will use to ensure there is a bucket that it will use as the context for Streamer.log(key, value). Buckets are either created or consumed based on the unique combination of an access_key and a bucket_key. If you want to switch to a new bucket simply call Streamer.set_bucket(bucket_name='some_bucket_name'[, bucket_key='some_bucket_key']). Note that bucket_key is optional, if not provided the module will create a uuid4 as the bucket_key. Here is an example:
							streamer = Streamer(bucket_name="Starting Bucket", access_key="YourAccessKey")

							streamer.log("key1", "starting")

							streamer.set_bucket(bucket_name="New Bucket")

							streamer.log("key1", "starting")
In this example, you will get a key1=starting in two different buckets: “Starting Bucket” and “New Bucket”.
streamer.log("siganl", 5, epoch=time)
streamer.log("key1", "starting")
streamer.set_bucket(bucket_name="New Bucket")
streamer.log("key1", "starting")
Troubleshooting
Setting Debug Level
If you’re having issues with your data you might want to try running the Initial State Streamer Module at a higher debug level:
logger = Streamer(bucket_name="SomeBucketName", access_key="YourAccessKey", debug_level=2)
With a debug_level at or greater than 2 the streamer will throw exceptions on logging errors. Otherwise, it will assume logging errors are not fundamentally exceptional. It will also display more verbose logging information.
Missing Events
If the Streamer cannot ship a set of events during a flush, it will retry a few times before deeming it a failure. If it does fail, it will attempt to save the payload to a local file. This payload will be in a JSON format inside a JSON array. Each array can be individually submitted to Initial State’s events API to fill in any missed events.
Sending to a Deleted Bucket
A common error we’ve seen is trying to send data to an already deleted bucket. If you have deleted a bucket from your bucket shelf, it cannot be recreated and you cannot send data to it again. You must send to a new bucket with a different access key/bucket key combination.
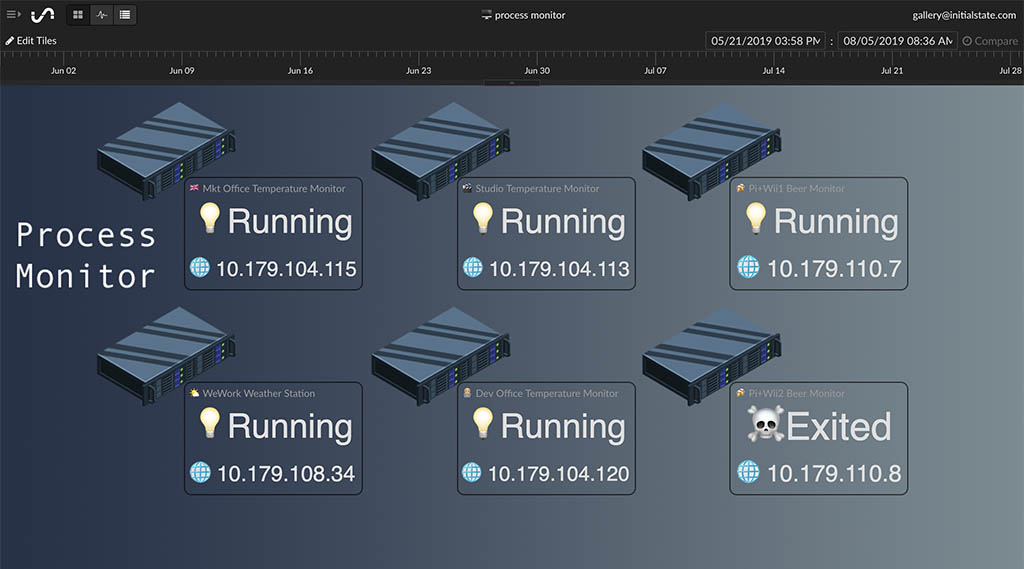
Raspberry Pi Projects
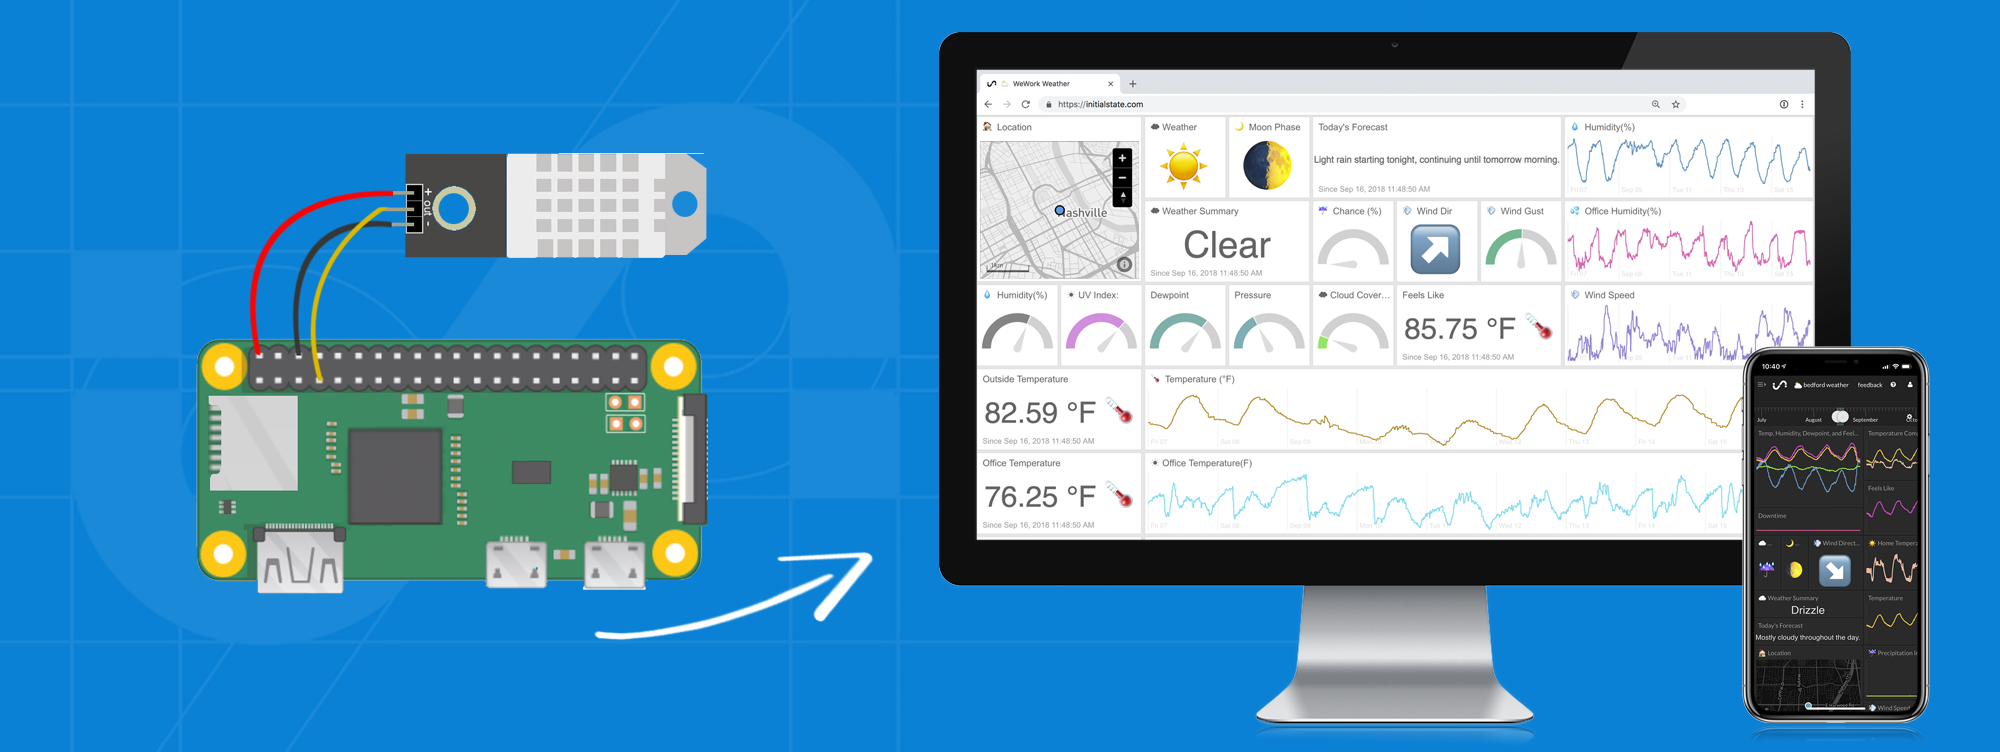
Temperature — You can use a Raspberry Pi and multiple types of temperature, humidity, and/or pressure sensors to send temperature data and monitor the environment in your home or office.
https://medium.com/initial-state/how-to-build-a-raspberry-pi-temperature-monitor-8c2f70acaea9
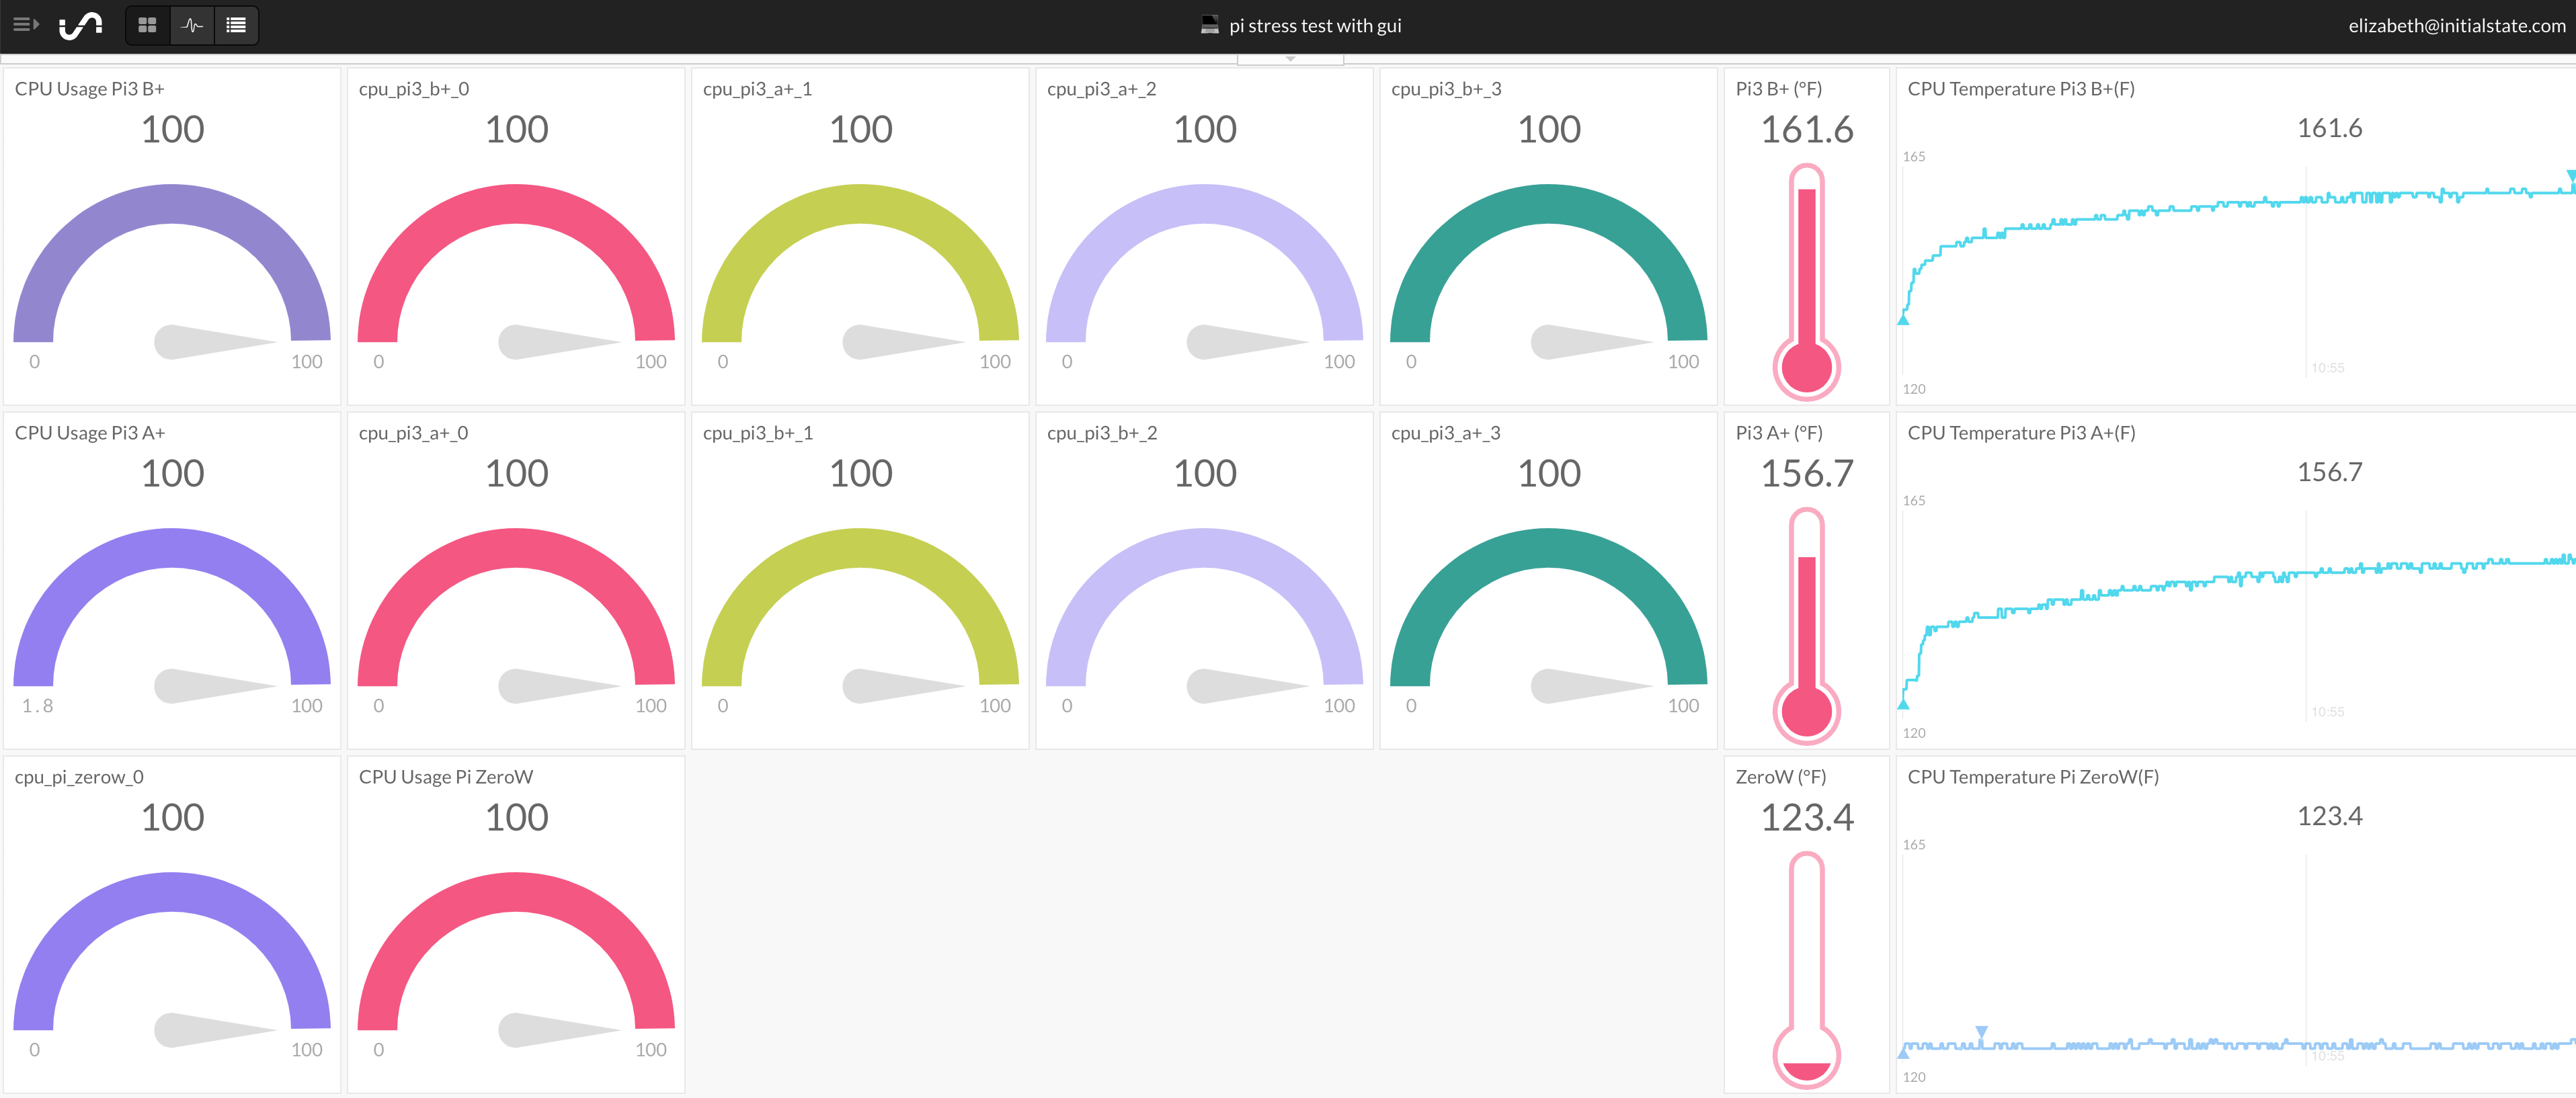
Pi Health — Monitor the health of your Raspberry Pi. Send data from Raspberry Pi to a dashboard to view CPU usage, CPU temperature data, and memory.
https://www.hackster.io/elizabethna/pi-health-dashboard-9935cf
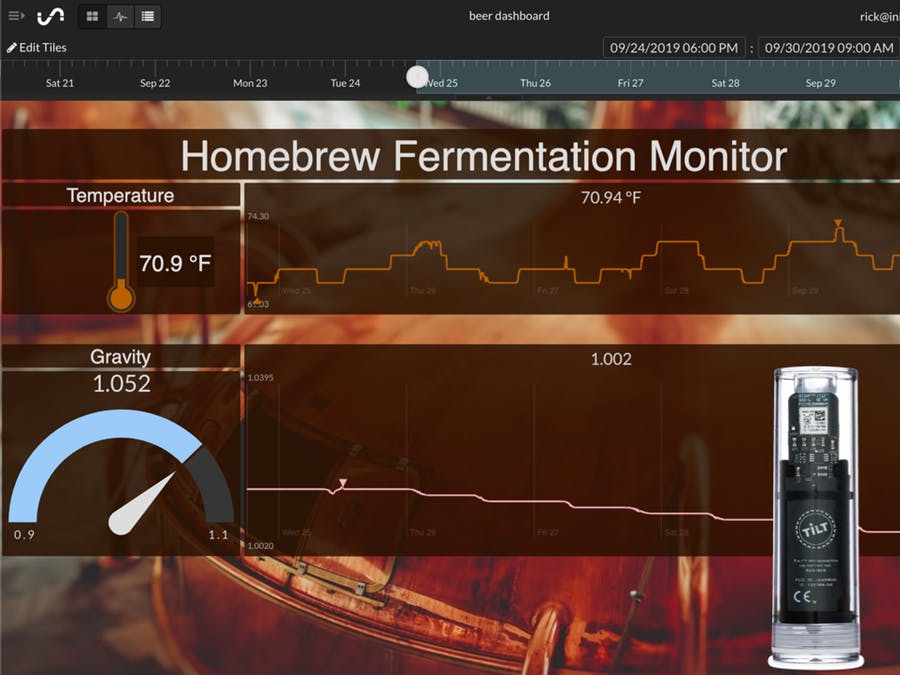
Beer Brewing — Watch your home-brew fermentation from anywhere and get a text when it’s ready using the Tilt Hydrometer and Raspberry Pi. You’ll be able to view gravity and temperature data from the Tilt Hydrometer.
https://www.hackster.io/rick-kuhlman/beer-brew-with-cloud-monitoring-tilt-pi-initial-state-29b3ab
Smart Scale — Create a sarcastic, smart scale with a Raspberry Pi and Wii Balance Board.
https://www.hackster.io/elizabethna/raspberry-pi-smart-scale-5ae2a2
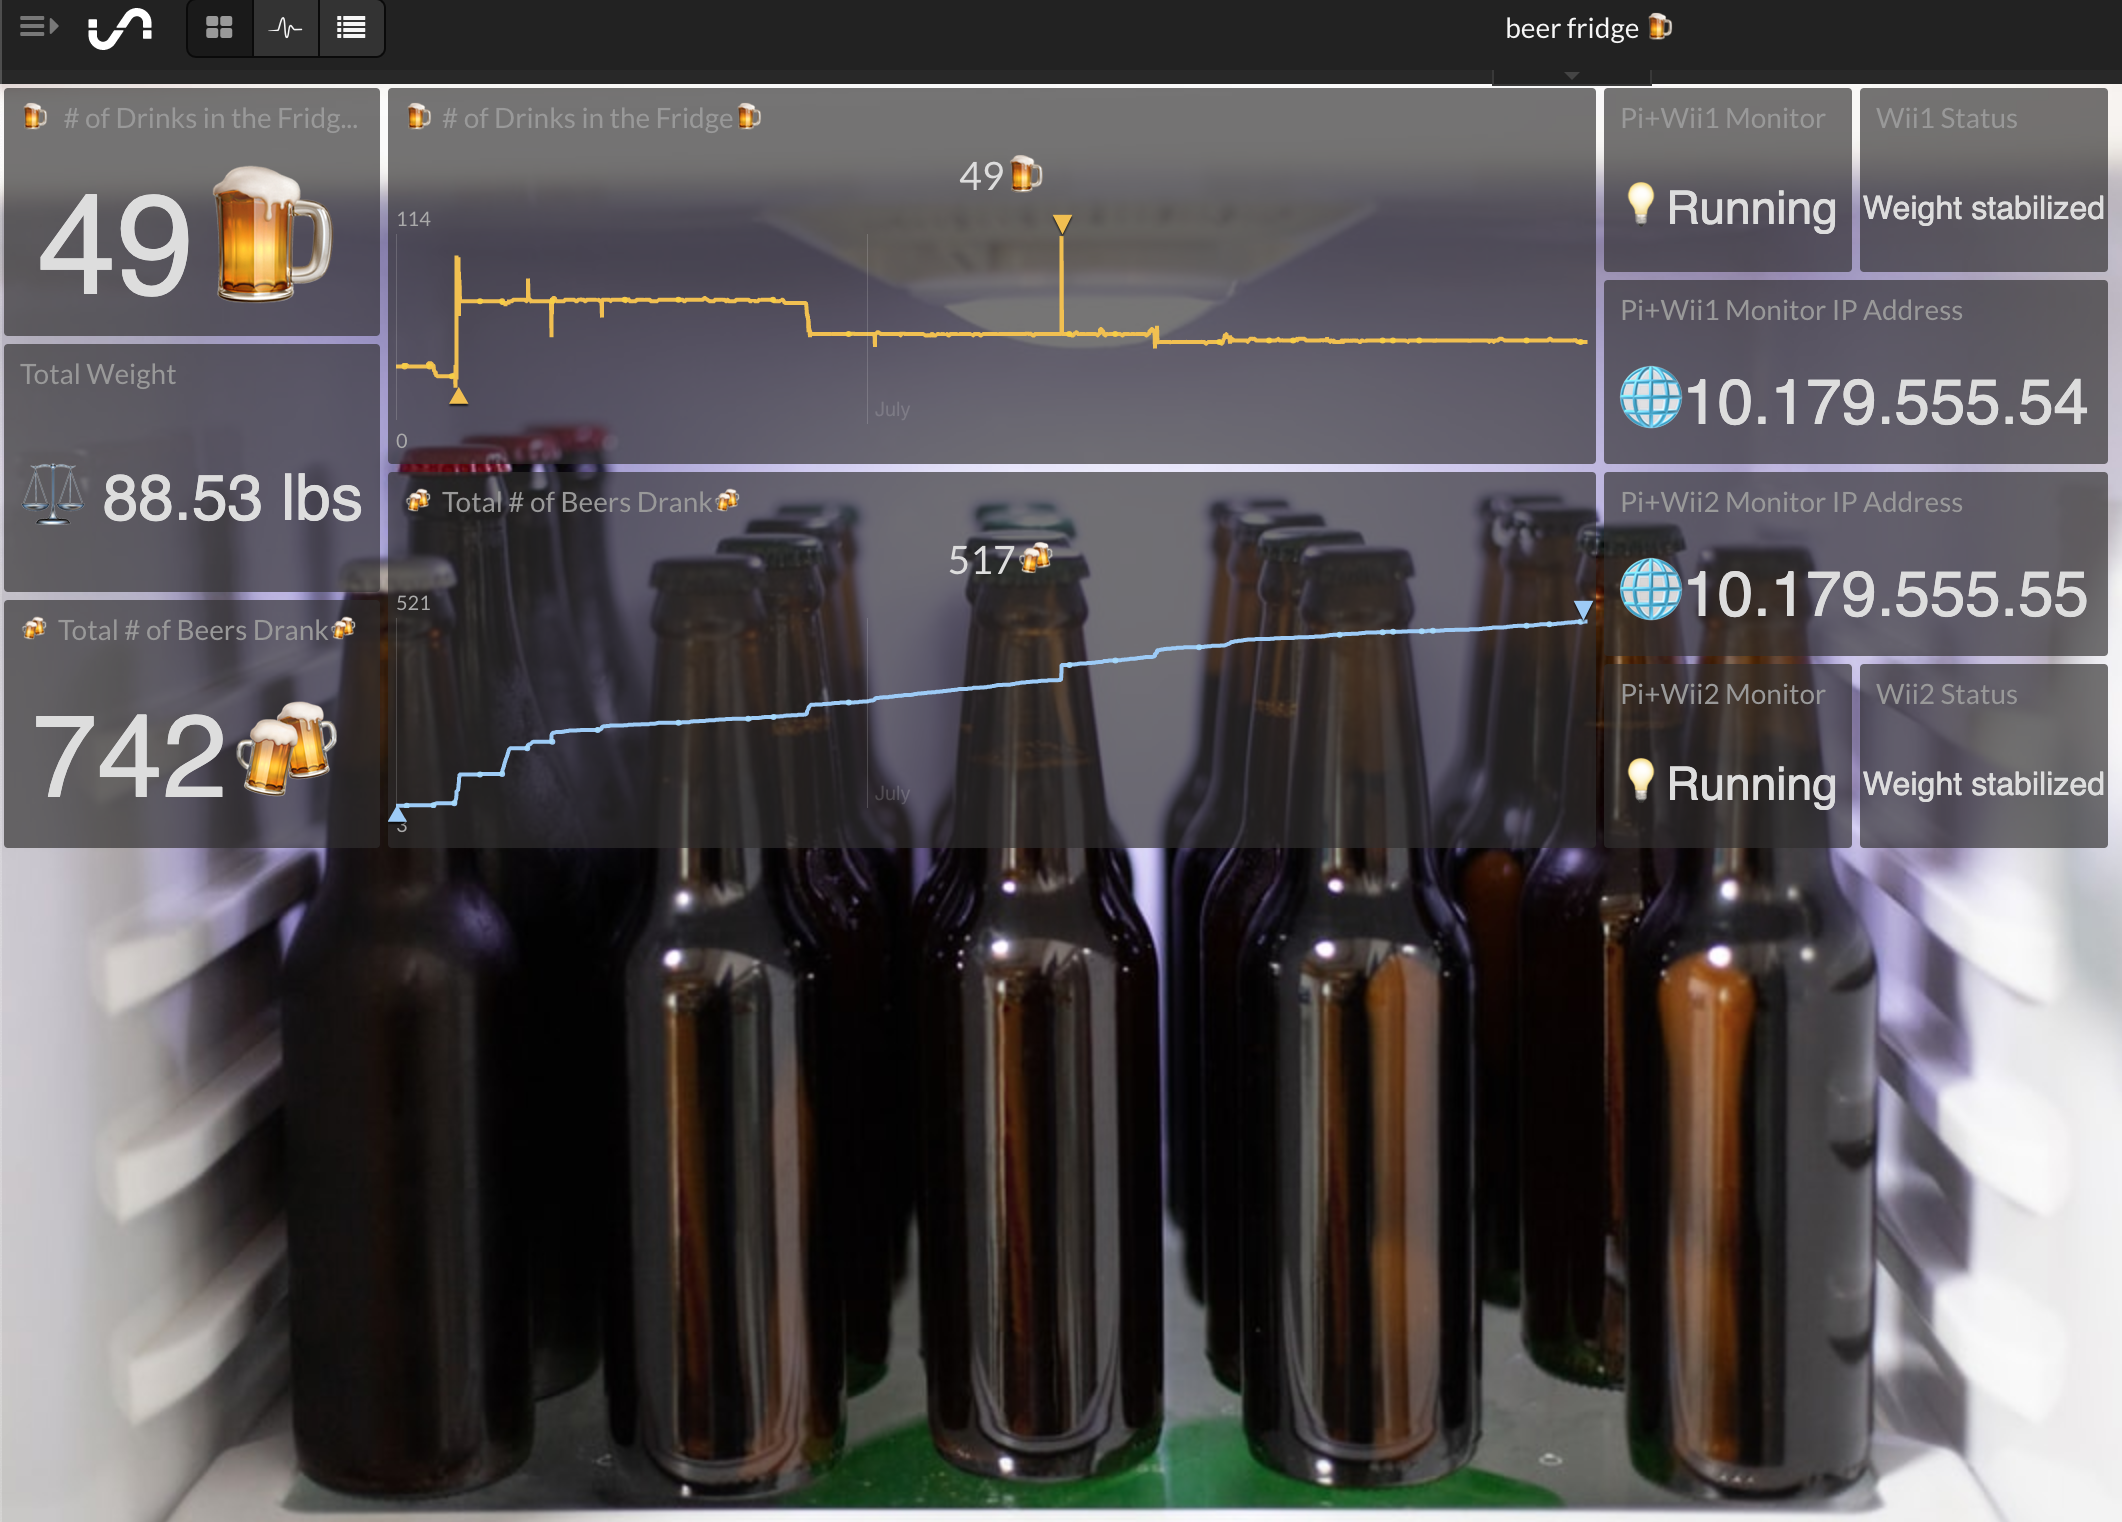
Smart Beer Fridge — Track how many beers you have, how many you’ve drank, and get an alert when your fridge is getting low with a Raspberry Pi and Wii Balance Board.
https://medium.com/initial-state/raspberry-pi-smart-beer-fridge-d345a37e307c
GPS Tracking — Send longitude, latitude and speed with a BerryGPS-GSM and Raspberry Pi Zero.
https://www.hackster.io/elizabethna/real-time-gps-tracking-11686f