Input Controls:
Design Your Own Device Control Experience

Jamie Bailey | Nov 13, 2020
Introduction
Being able to control things directly from a Tiles dashboard has been one of the most requested Initial State user features. You now have the option to add four new input control tile types to your dashboard - button, switch group control, range control, and text field control. When combined with the Initial State Read API (more info), input controls give you the ability to design your own device control experience on either a desktop or mobile device.
This article will go over the basics of input controls, how to use each control type, and a short/fun example project that pulls it all together - an IoT fan that turns on and off on command from your mobile device.
How Input Controls Work
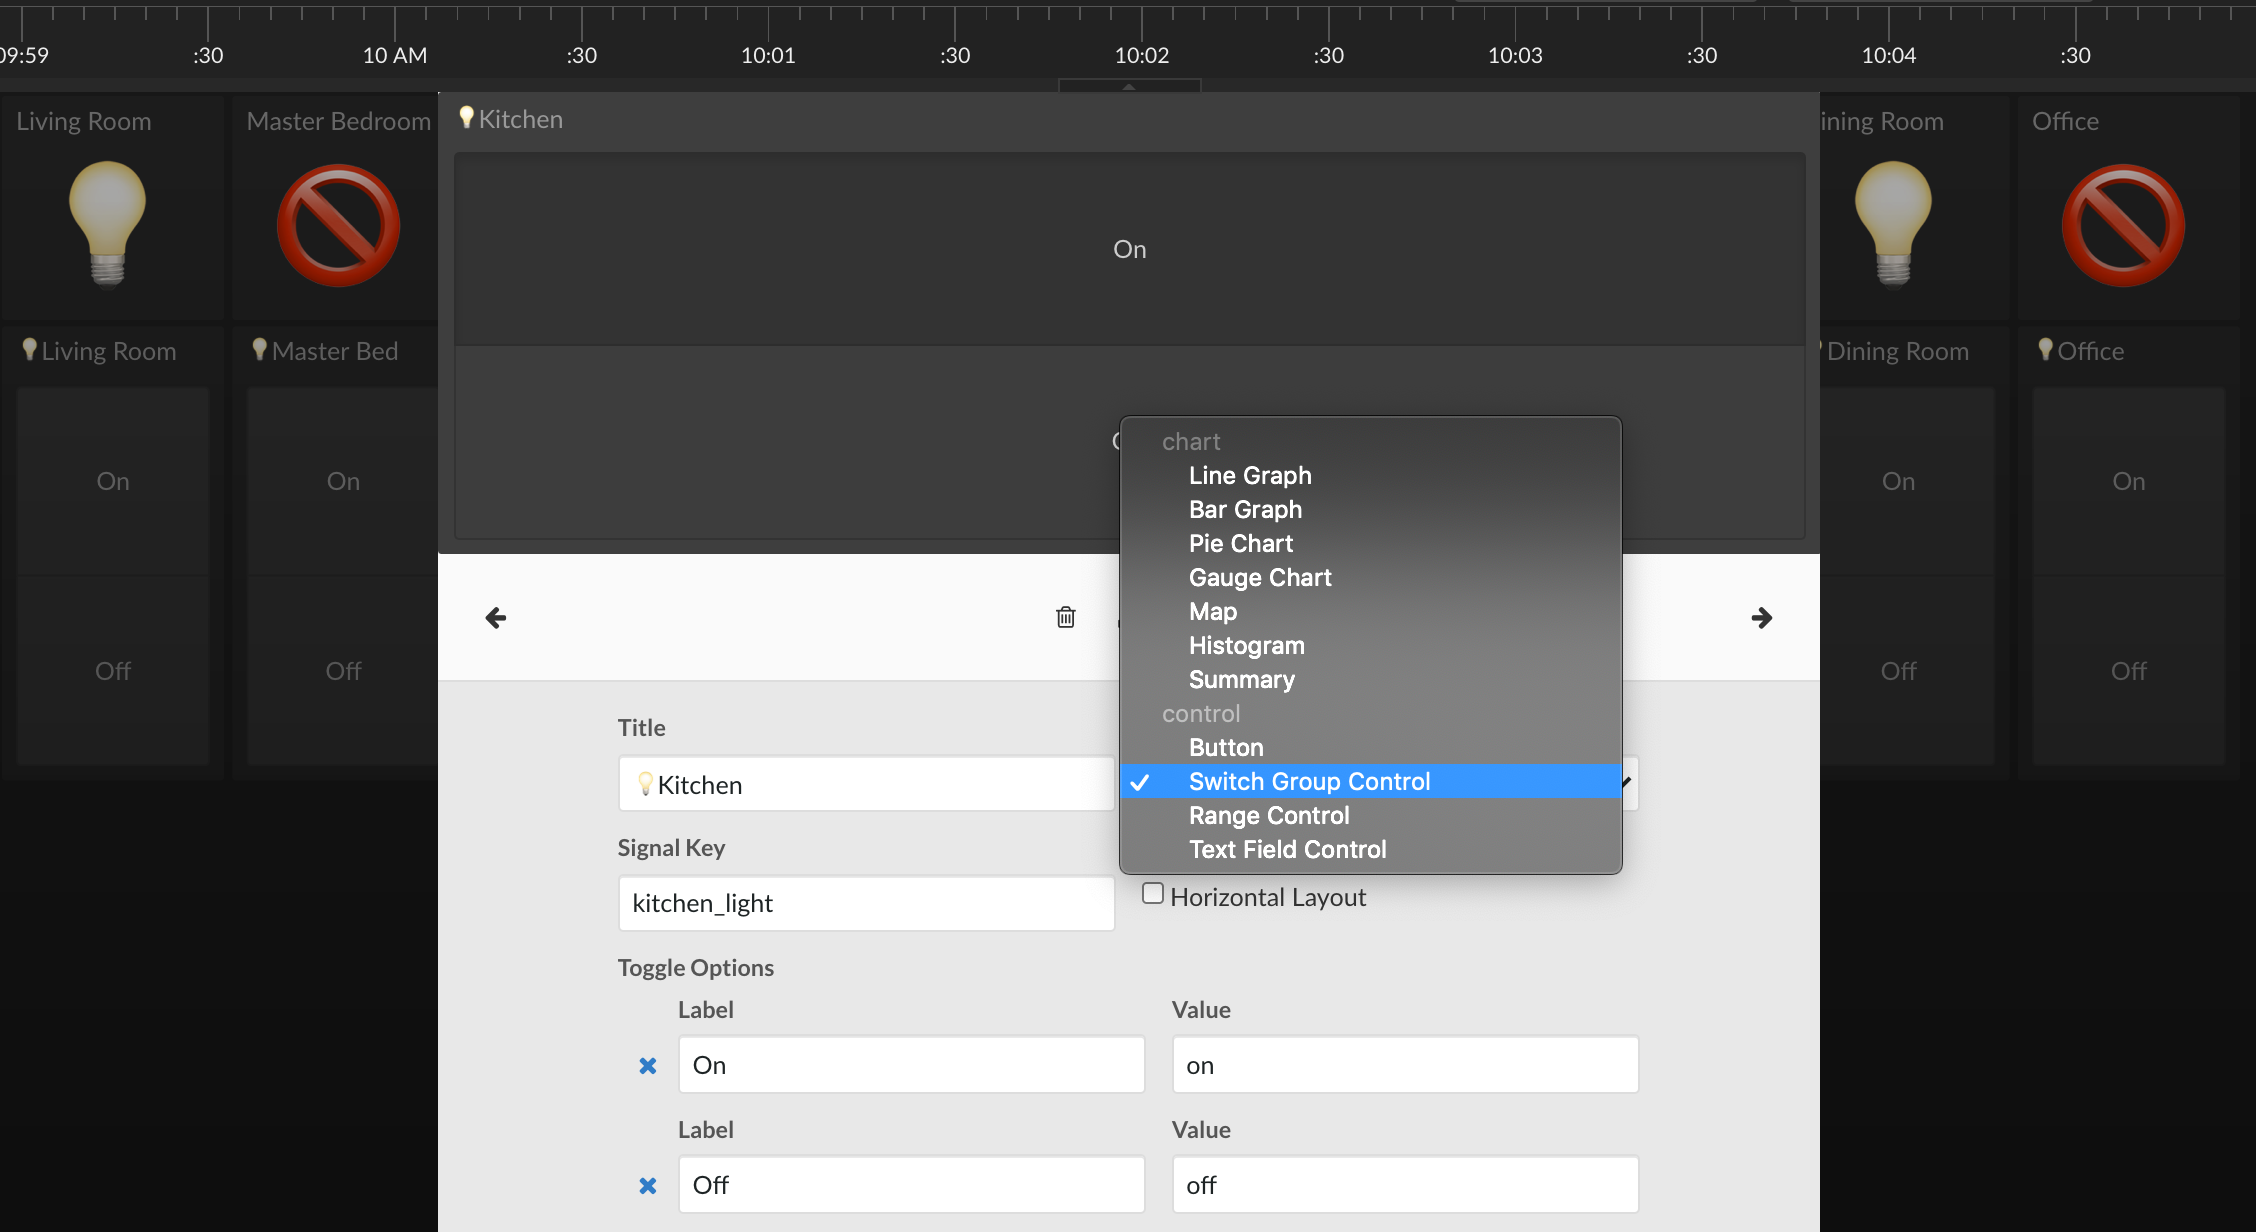
To add an input control tile to your dashboard, select the desired type from the Tile Type drop-down when you add or edit a tile. Input control tiles can only send data into the same data bucket as the dashboard you are creating/modifying. This means you will need to specify the signal key associated with the input tile (the one exception is the button tile, which has an option to open a URL). The signal key can be either existing or new. Once added, user inputs will create changes to the value of the associated signal key.
For example, a simple on/off switch can be created using the Switch Group Control tile type. When a user clicks "off", the value "off" will be sent to the associated signal key.
Input controls become really useful when a device you want to control accesses the generated data via the Initial State Read API. For example, a smart light switch reads the value "off" from the aforementioned signal key and performs a corresponding action.
Input Control Type: Switch Group Control
This switch group control tile allows you to build a switch with two or more actions. Specify the signal key, then specify the values and labels for each switch level. By default, this tile type produces "on" and "off" and has respective labels for each action. You can change these values and labels as well as add additional actions to produce the desired data possibilities. Clicking on the switch sends the specified data into the signal key in your data bucket.
This input control type is most useful for building on/off switches.
Input Control Type: Range Control
The range control tile allows you to build a slider that sends a number within a specified range on click release. Specify the signal key, minimum and maximum value, and the numerical increment of the slider. The numbers specified can be integers or floats.
This input control type can be used in projects that require setting PWM levels for controlling power output (e.g. brightness of an LED or light), controlling volume levels, motor speeds, etc.
Input Control Type: Text Control
The text control tile allows you to send text strings. Specify the signal key that receives the input text string.
This input control type can be used to send custom commands to a device such as "shutdown", "reboot", "runscript", etc. This allows you to build your own custom remote command interface for your device/service. You can also use this tile type to drop timestamped notes/messages into your dashboard.
Input Control Type: Button
The button control tile allows you to either link to a URL or to send a specific data value to a signal key. Specify the action of the button to be either Open URL or Add Event. If the action is Open URL, set the button label and destination URL. If the action is Add Event, specify the associated signal key and the desired data value that will be sent on press.
This input control type is useful for linking to other Initial State dashboards or external links related to your dashboard such as documentation or other services. You can also use this tile type to create shortcuts to common actions such as "shutdown" or "run a script".
Example Project: IoT Fan
Let's build a simple IoT project that utilizes input controls to remotely turn a fan on/off. This type of project could be useful in a server room or media closet when a device starts overheating and you need to remotely turn on a fan to move hot air away from your equipment. This project requires the following:
- Raspberry Pi (or Raspberry Pi Zero) with micro SD card and power supply
- IoT Power Relay (by Digital Loggers)
- Two male-to-female jumper wires
- A fan (e.g. a desk fan that plugs into a normal power outlet)
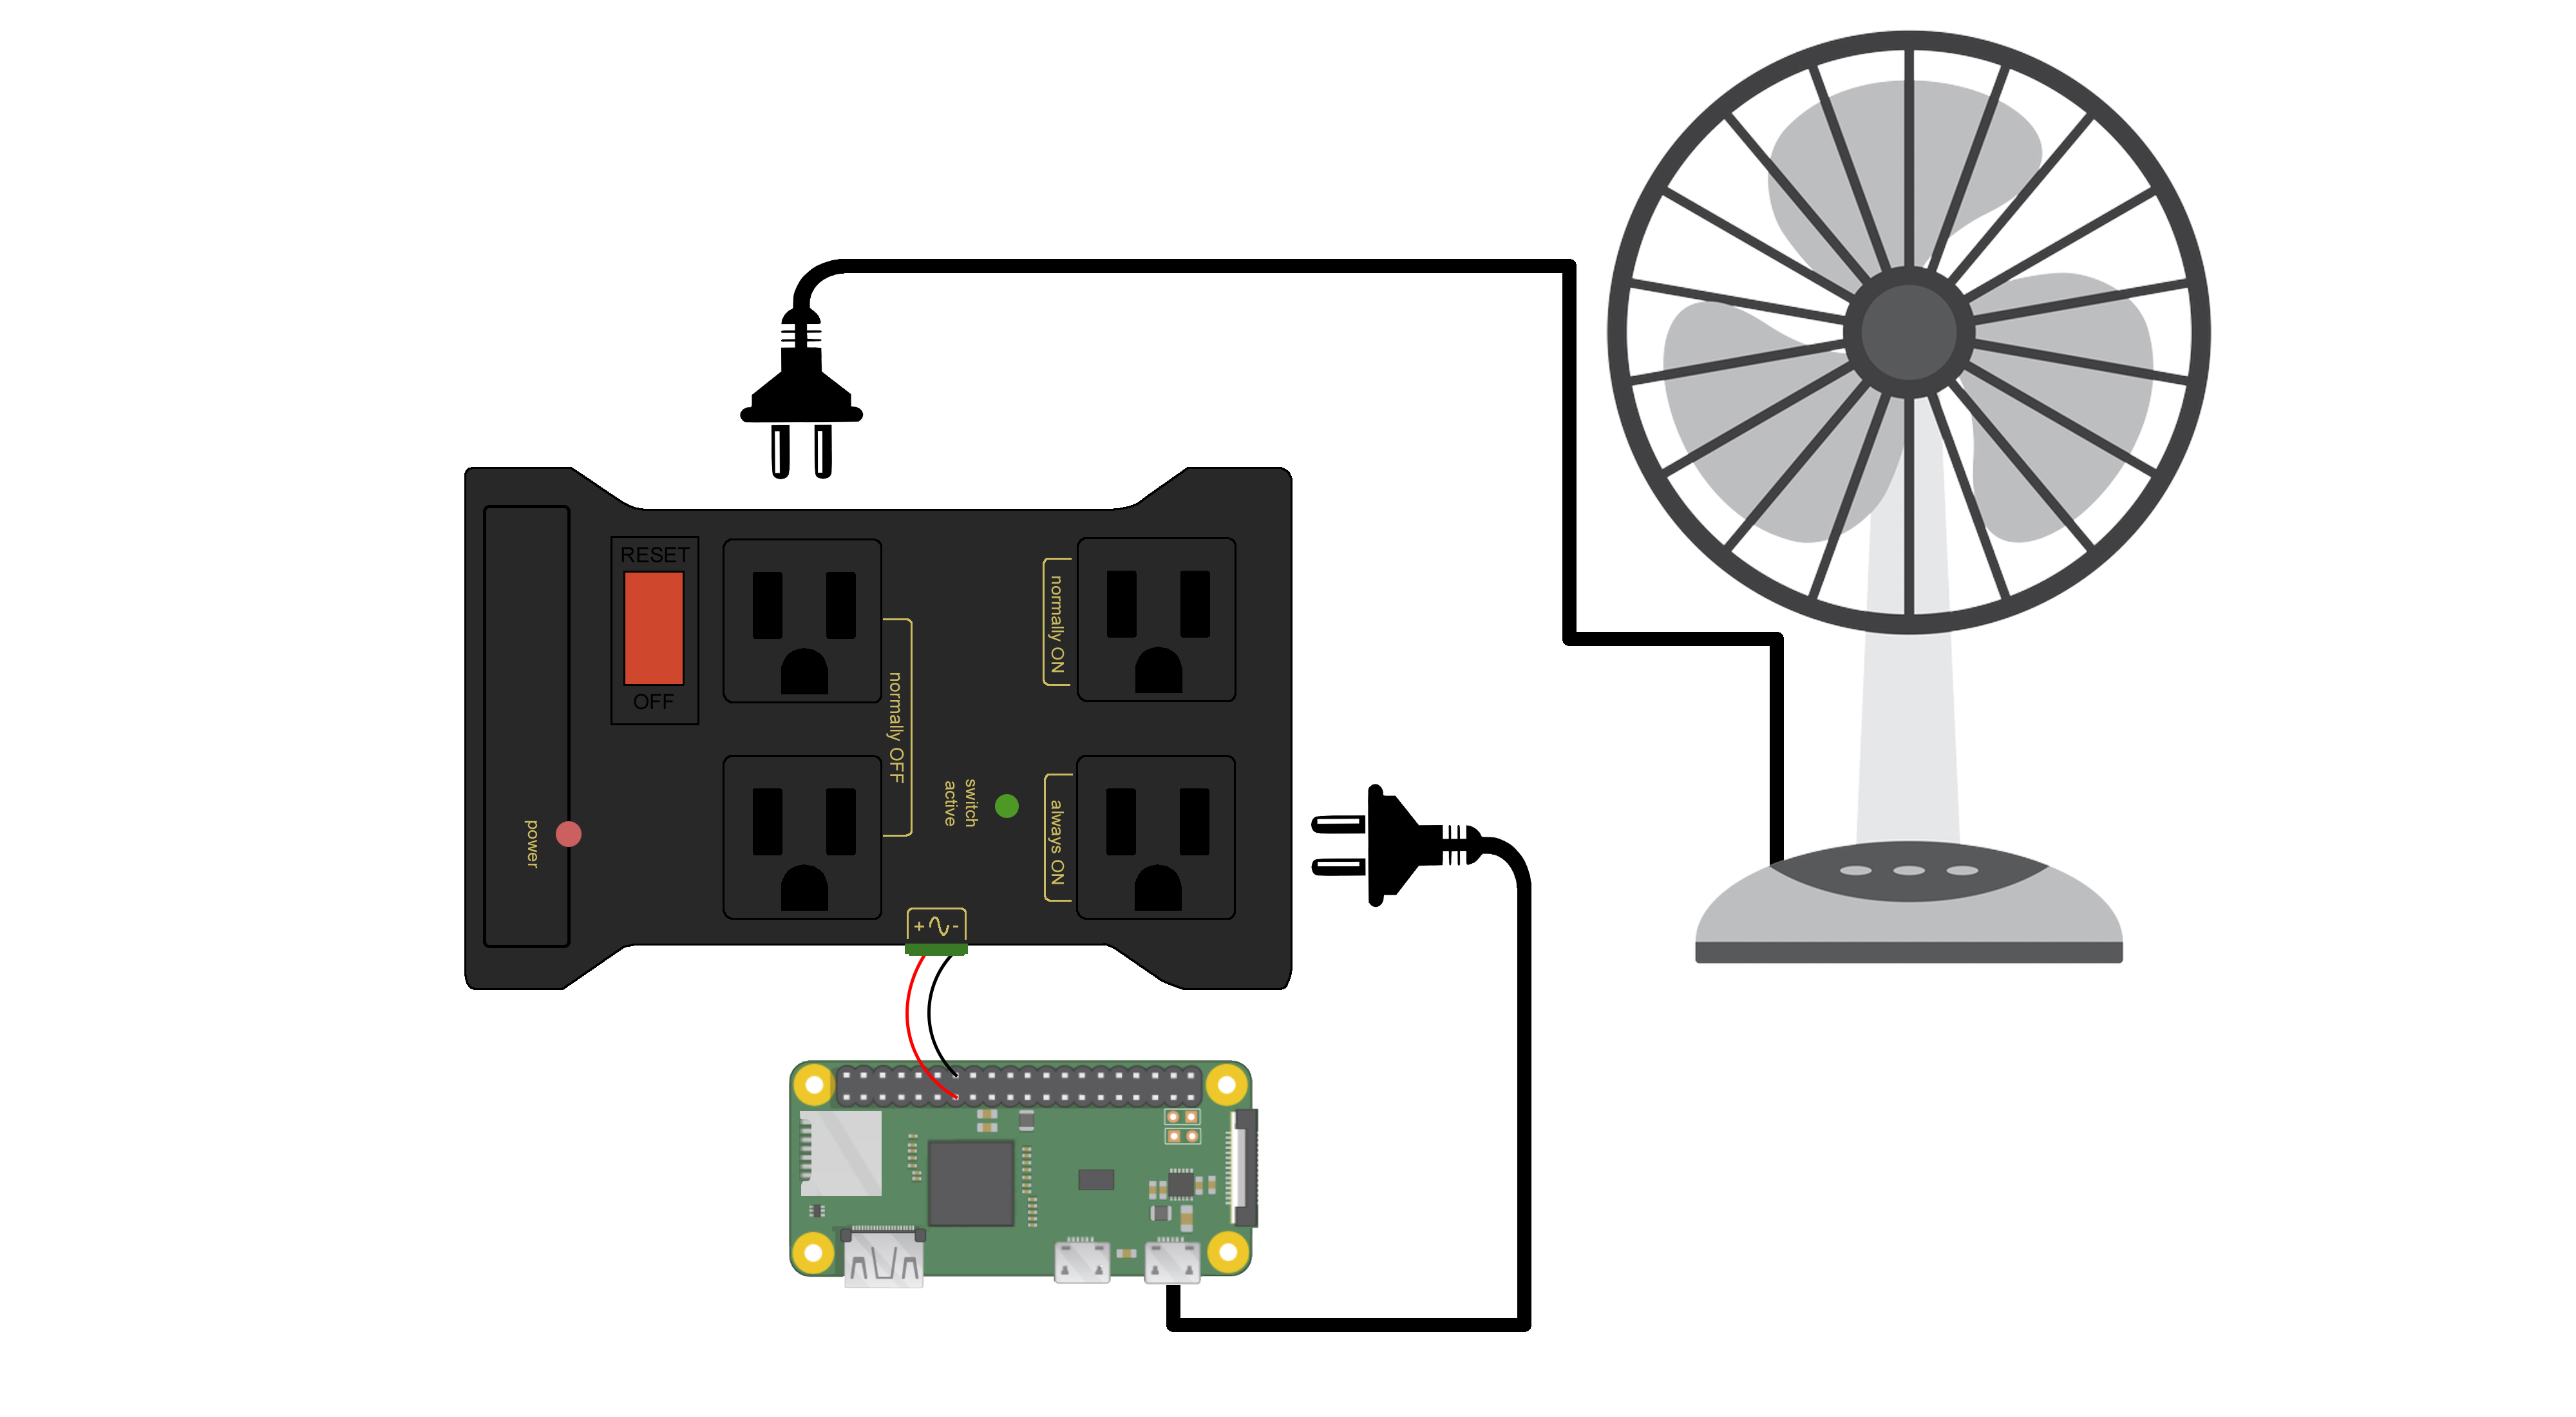
Once Raspberry Pi OS is installed (instructions) and you have set up Wi-Fi (instructions) on your Pi, you are ready to connect it to the IoT power relay. This device is simply a power strip that has a digital input that can turn on/off three of the four power plugs with a simple 3.3V/5V connection. Connect Pi GPIO27 (pin 13) to the '+' terminal and GND (pin 14) to the '-' terminal of the power relay (use the screw terminals to tighten the connection of the jumper wires then reconnect the terminals to the power relay).

Plug the Pi power into the "always on" plug and the fan into the "normally off" plug. The complete setup will look something like the following:
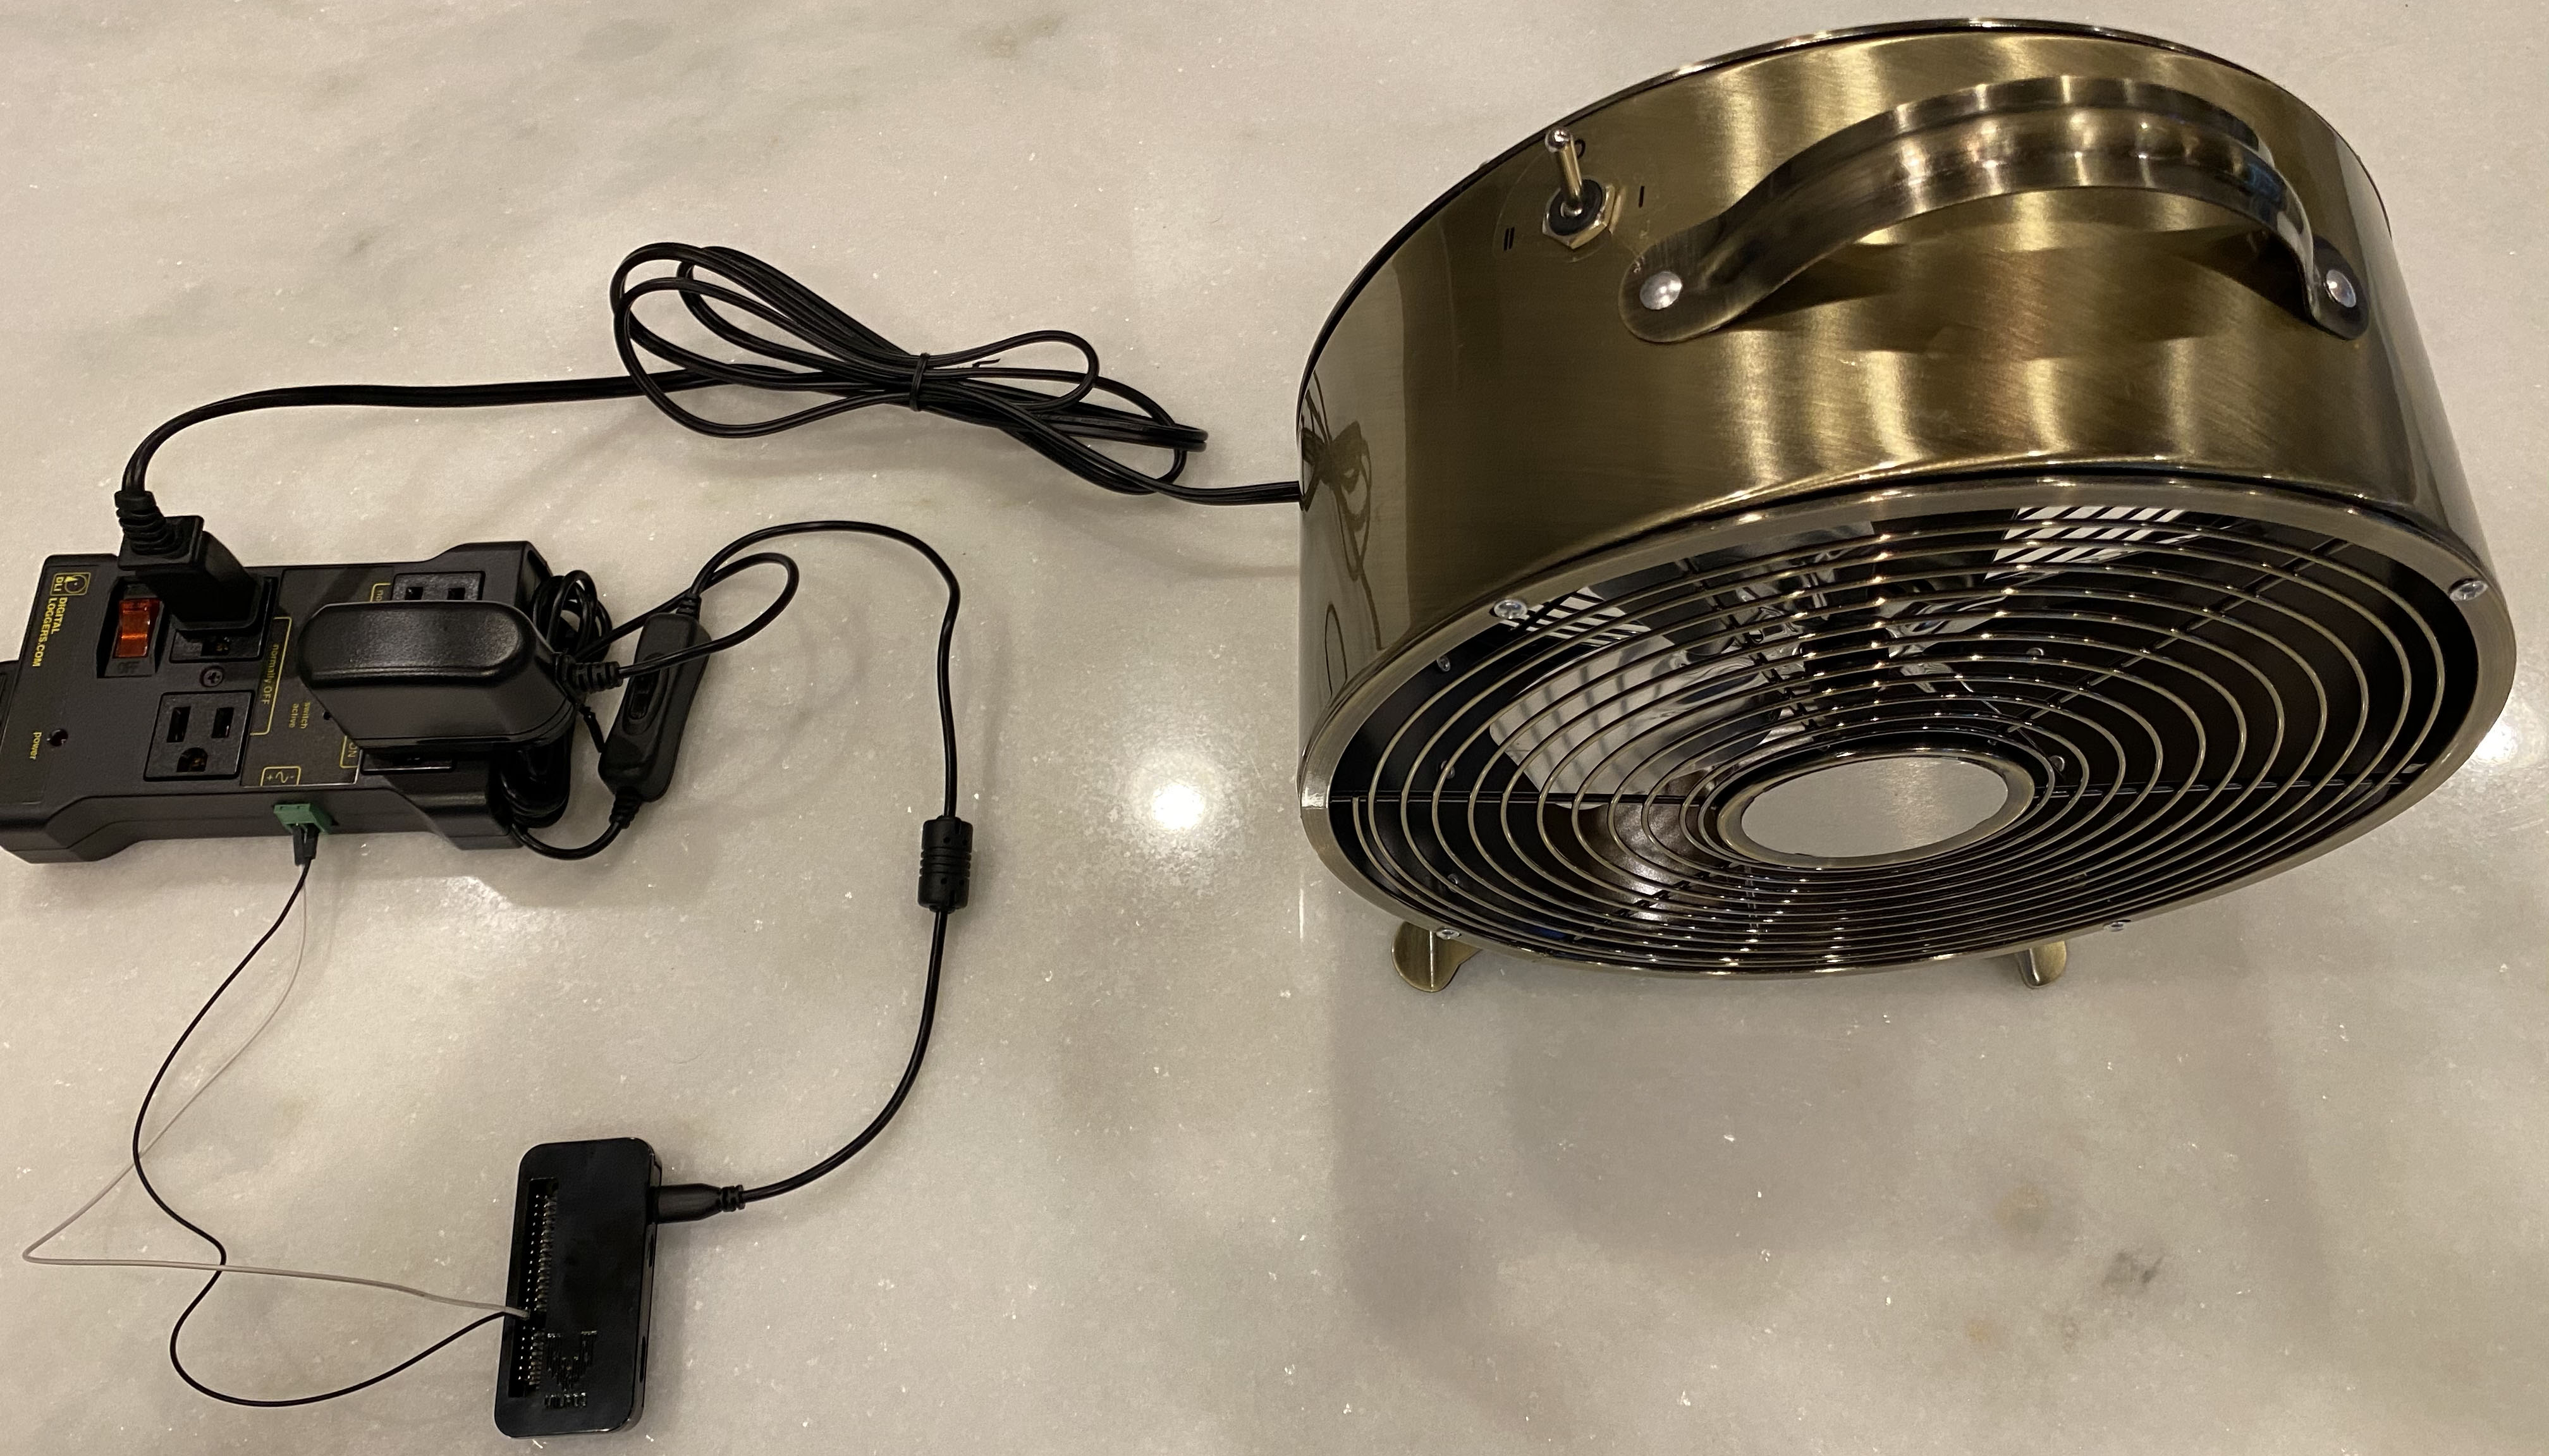
When the GPIO27 pin is set high on the Pi, the fan will turn on. When that pin is set low, the fan will turn off. We want to do this programmatically through a Python script. Before we write our script, let's set up our Initial State dashboard that we will use to turn our fan on and off.
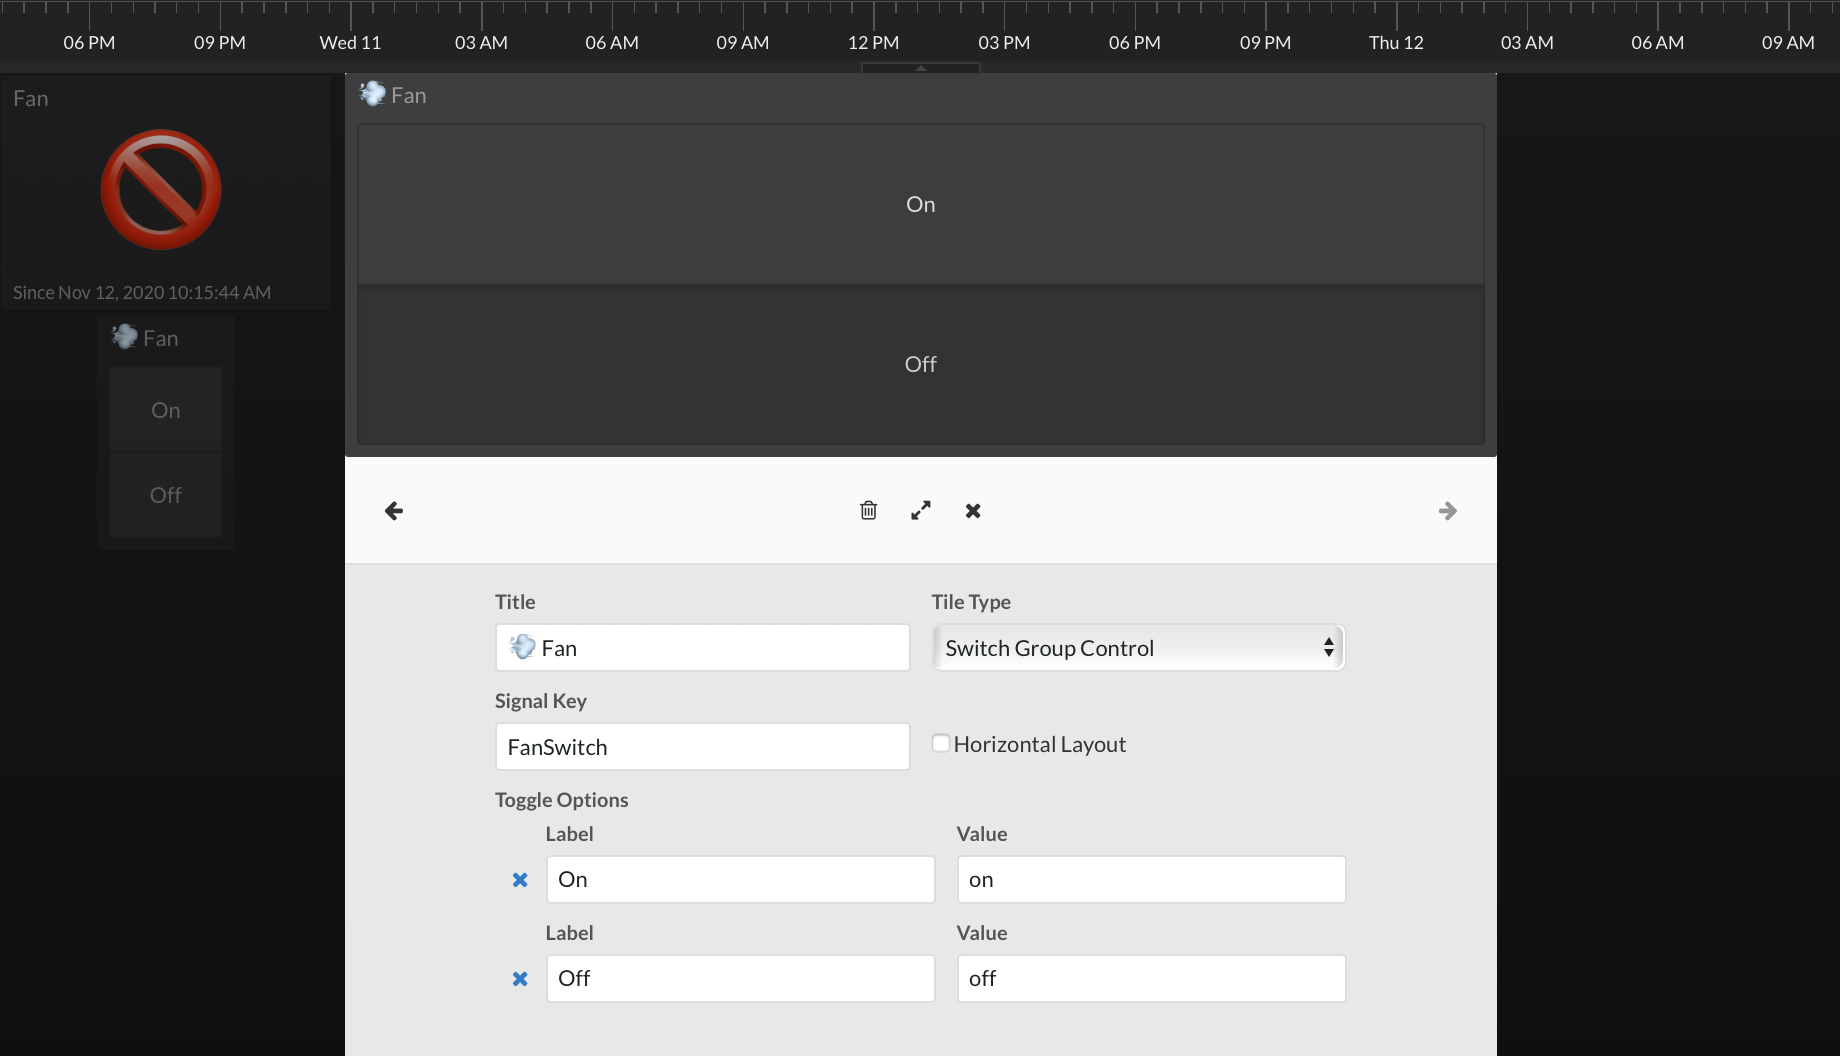
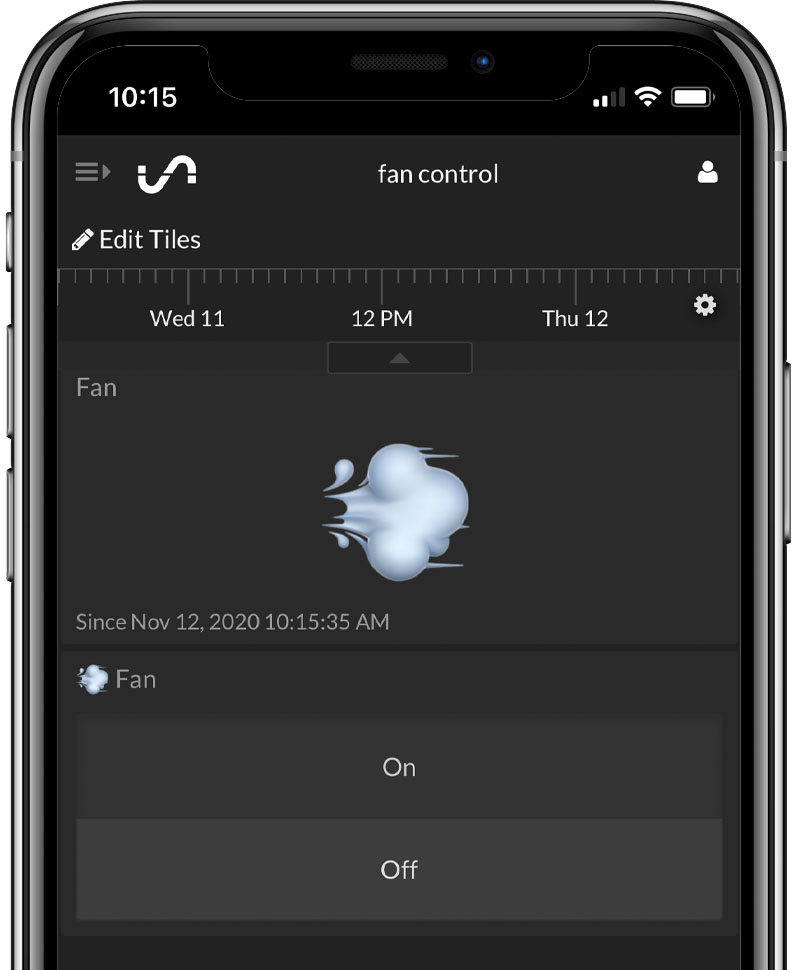
Log into your Initial State account and create a new data bucket (the +cloud icon at the top of your bucket shelf). Add a tile and select the "Switch Group Control" tile type. Set the Signal Key field to "FanSwitch". This will create a new signal key the first time we click our switch. Leave the Label and Value fields their default values (On/on and Off/off respectively). Close the edit tile dialog box and exit edit tiles mode. Click the newly created switch on and off. Notice a new tile corresponding to FanSwitch gets automatically created and changes values to "on" and "off" when you click on the switch tile. You can make that auto-generated data tile look a little better by adding the following real-time expression (more info):
							=(([FanSwitch] == "on"):"💨") |

 						 	 (([FanSwitch] == "off"):"🚫")
(([FanSwitch] == "off"):"🚫")
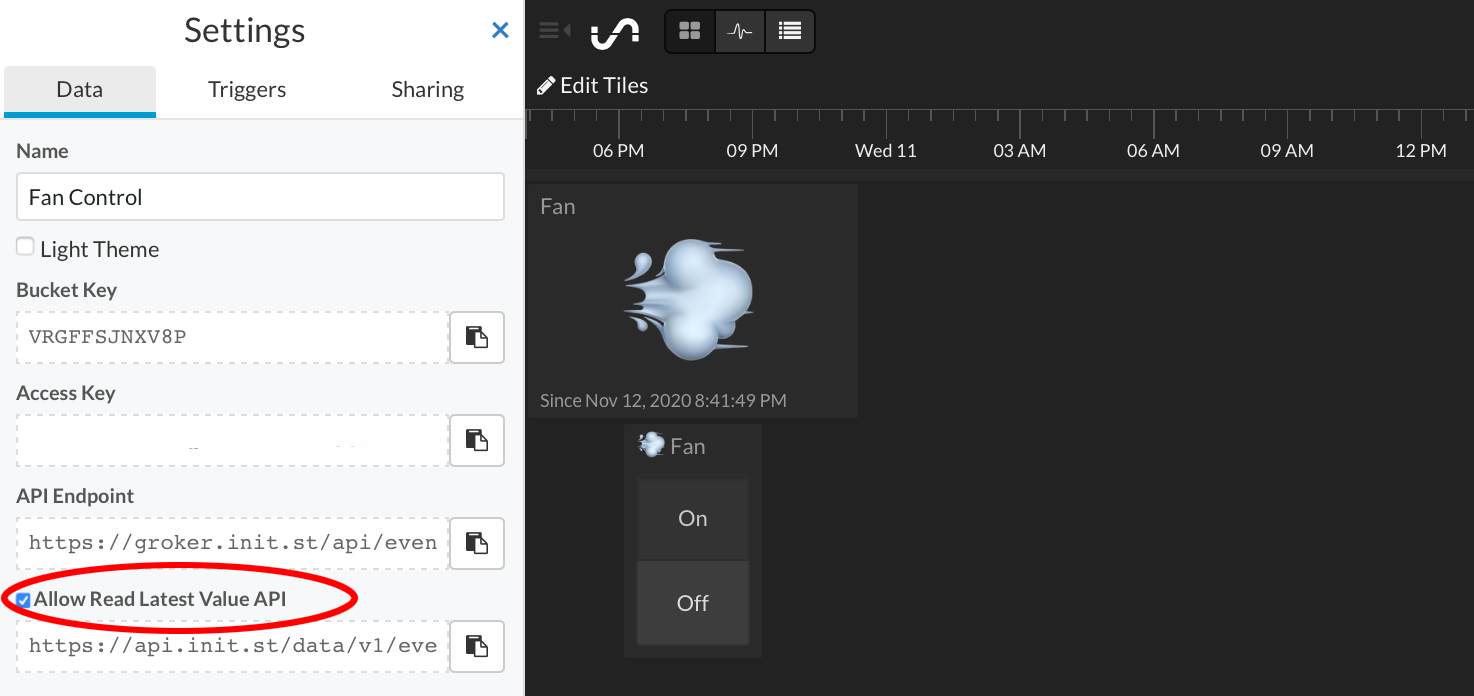
The next step of this project is to connect the "on" and "off" values that we generate from our input control tiles to the IoT fan control in our Pi. To do this, you first have to enable read API access to your data bucket. Go into your bucket settings and click the "Allow Read Latest Value API" option. Click the "Done" button at the bottom to apply your changes. You now have the ability to read the "FanSwitch" data stream via the Read API.
On your Pi, install the ISReader module to make using the Read API in Python super simple. At your Pi terminal:
sudo pip install ISReader
If you are using Python3, use pip3 instead of pip. Create the following Python script on your Pi and specify the two keys, ACCESS_KEY and BUCKET_KEY (found in your bucket settings), in the User Settings section:
							from ISReader.Reader import Reader

							import gpiozero

							import json

							import time


							# --------- User Settings ---------

							ACCESS_KEY = "PLACE YOUR INITIAL STATE ACCESS KEY HERE"

							BUCKET_KEY = "PLACE YOUR BUCKET KEY HERE"

							FAN_CONTROL_KEY = "FanSwitch"

							FAN_GPIO_NUM = 27

							READ_API_POLLING_TIME = 5

							# ---------------------------------


							# Create Reader instance

							reader = Reader(access_key=ACCESS_KEY, bucket_key=BUCKET_KEY)


							# Set Pi GPIO for fan control pins

							fan = gpiozero.OutputDevice(FAN_GPIO_NUM, active_high=True, initial_value=False)


							while True:

							    # Read the latest values from the Initial State Read API

							    events = reader.get_latest()


							    # Turn the fan on or off

							    if (events[FAN_CONTROL_KEY]['value'].lower() == "on"):

							        fan.on()

							    elif (events[FAN_CONTROL_KEY]['value'].lower() == "off"):

							        fan.off()


							    time.sleep(READ_API_POLLING_TIME)
This script simply reads the FanSwitch data value from your data bucket and sets the GPIO specified in the User Settings to on if it reads "on" and to off if it reads "off". Then end result is your fan turning on and off as you click the input control tile in your dashboard.
import gpiozero
import json
import time
# --------- User Settings ---------
ACCESS_KEY = "PLACE YOUR INITIAL STATE ACCESS KEY HERE"
BUCKET_KEY = "PLACE YOUR BUCKET KEY HERE"
FAN_CONTROL_KEY = "FanSwitch"
FAN_GPIO_NUM = 27
READ_API_POLLING_TIME = 5
# ---------------------------------
# Create Reader instance
reader = Reader(access_key=ACCESS_KEY, bucket_key=BUCKET_KEY)
# Set Pi GPIO for fan control pins
fan = gpiozero.OutputDevice(FAN_GPIO_NUM, active_high=True, initial_value=False)
while True:
# Read the latest values from the Initial State Read API
events = reader.get_latest()
# Turn the fan on or off
if (events[FAN_CONTROL_KEY]['value'].lower() == "on"):
fan.on()
elif (events[FAN_CONTROL_KEY]['value'].lower() == "off"):
fan.off()
time.sleep(READ_API_POLLING_TIME)
Run the script and test. Project complete!!